Everybody told me that the way to render out from Cinema 4D was in multi-passes. That you split the image up in different "passes", and put them together again in a compositing software for better adjustments in post production.
I tried to read about how to do this, but I couldn’t find anything good or a bit more advanced about how to. So I figured I’ll learn it by myself and make an "easy to understand" tutorial so that more people could learn this very useful technique in their workflow.
Multi-Pass?
So, what is a multi-pass render? Usually, when you render out from Cinema 4D, you render out a flat image. A so called "Backgound" og "Regular Image". There is no good way to adjust this picture in post production without crushing the colors or destroying the picture. So how do we adjust the intensity of the shadows, reflections, specular and other filters? Multi-passes. A pass is a layer with only the information of the desired layer, i.e. only the reflections or shadows.
I’ll use a scene with a mini-cooper in this tutorial. If you want to follow, you may download the free scene at oyonale.com.
Software used in this tutorial
Cinema 4D 11.5 and After Effects CS4.
To the case
So everything looks near perfect in the preview render with the right light, materials and so on. But you want to have a bit more control over the picture in the compositing.
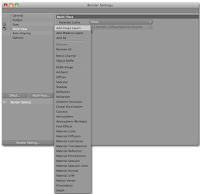
 Lets start with opening the render settings. Now check of the multi-pass box at the left side of the "Multi-Pass" name. This enables multipass, obviously. Now, click the "Multi-Pass..." button. This will enable you to choose whitch passes you want to include in your render. What I like to do, is to render a complete image using only multi-passes, and not use the background image at all. The background image is great for looking at your render, but it includes all the passes (whenever you have enabeled multi-pass or not) inside itself. So if you use the regular image beneath the passes, you’ll just apply information that is already included in the image, it wont look good at all and you won’t be able to turn of for instance the shadows or the reflection, since they’re already there.
Passes
To render at complete image with passes only, you may choose «Add image layers» in the «Multi-Pass... menu» (still in the render settings). You’ll get a quite long list of different passes on the left side: Ambient, Diffuse, Specular, Shadow, Reflection, Refraction, Ambient Occlusion, Global Illumination, Caustics, Atmosphere, Atmosphere (multiply) and Post Effects.
I don’t think you really need all of these to get a good image to work with, so I’ll try to point out whitch you’ll need:
Reflection - Yeah, the reflections.
Refraction - Also called deflections. The reflections and light passing through glass, windows etc.
Shadow - Render all the shadows in the scene. There are different ways to control the shadows (and lights). Usually don’t use this pass. I like to control the lights and shadows like this:
Go to the «render settings» and click the «Multi-Pass»-name. You’ll get som few choises; Under «Separate Lights» choose «All». This will enable you to adjust the lights in the compositing. Under «Mode» choose whatever you wish. I like to choose 3 (diffuse+specular+shadow) channels to get the most out of it, but 2 (diffuse+specular,shadow) works as well. Check the «shadow correction».
But since there is no lights in our scene to add, check the shadow pass to render the shadows as well.
Diffuse - The geometry without any light, shadows, reflections or anything. Just plain ugly geometry. If you enabeled the «seperate lights,» the diffuse pass will be rendered there, and there’s no need for this pass, but I tend to keep it even so. Just play with the opacity and you render could look a lot better. So keep this in mind; the diffuse pass may be handy, even if you got two of them in a composition.
Global Illumination - Probably one of the most important passes to make the scene look realistic. GI is how the light behave. How it bounces from one object to another and lights up more places than just where the light first hit the target (an easy example to understand GI is to rig a table, place a spotlight over it and render. Without GI, the floor under the table is dark, but with GI enabled, some light rays get under there and lighten ut just a bit)
To make the Global Illumination work, you need to enable it to render in the Background image. Press the «Effects...»-button and choose «Global Illumination». You can play around with the settings, but I’ll keep it on default for now.
I have to say, this may be the heaviest pass to render. Sometimes GI is the only way to make the picture work, other times things work just fine without. If you manage to make things work without GI, don’t use it ;)
Ambient Occlusion - If you’re working with a still image that won’t take weeks to render, check this pass. But if you’re working with a longer sequence with animation, this pass could almost double the rendertime. But don’t worry, I got a solution for you in a second.
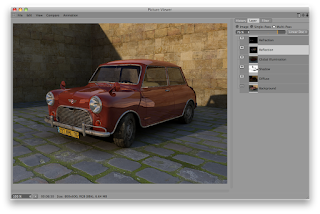
Render a test image. In the picture viewer (if you use Cinema 11.5), you can play around with the different passes, look at them or put them together to see how they work. You can even adjust the opacity for every pass and find out how your composition could look like in the end.
 Make Ambient Occlusion-pass render fast
The problem with Cinema 4D, is that it always have to render out the RGB Background image. So if you only need for instance just a pass, say Ambient Occlusion, C4D will render out the whole scene with materials, textures and so on. This will cause things to get slower than needed. I tried to render out a scene with AO as one of the layers in a multi-pass, and the whole picture took 19 minutes to render. Then I removed the AO-pass, and the picture only took 2 minutes to render. As you may understand, if you got thousands of images, the render will be many times longer with Ambien Occlusion added. But I got a work-around:
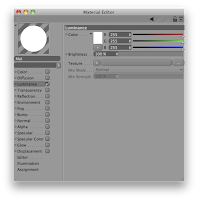
Take the c4d-file and duplicate it. Rename it «whatevername_AO.c4d». Open the file and delete every single texture both in the materials and in the objects-window (remove the texture tags). You need a clean scene. Then make a new material. Double click on it and only enable the «luminance» channel. The texture will become totally white making the render a white plane. Perfect. Now, go to the render settings and uncheck everything but the Ambient Occlusion effect applied on the background (not as a mult-pass). Be sure to check the «apply to scene» in the AO editor.
If you now render out the sequence, you’ll see that it won’t take as long as if it was a pass.
Afterwards, you just apply the AO-sequence over the rest of the composition (in AE or whatever). Use «multiply» as the blending mode to make the white colors transparent over the rest of the composition. The AO-render will works as a multi-pass even if it really isn’t.
Kind of wierd, but that’s how it works. In my test, I managed to render out only the AO in 5 minutes. So compared to 19 minutes to render with AO as a pass, to only 7 minutes (AO + the render without the AO(no GI-pass)) if you use this workaround. It will only take you five minutes to do, and may make the render time half as long. A really good tip if you’re working with longer sequences.
Delete the atmosphere, atmosphere (multiply) , the ambient, caustics, ambient and specular.

Pass-research
When you're working with other projects, try rendering all the passes, and browse through in the Picture Viewer to see whom you’ll need in the final rener. Just klick on the «layer»-tab, and choose multi-pass to turn on and off a pass. You should also check out the Single-pass-tab to use as research as well.
The saving and final compositing
Go inside «render settings» again and click on «Output». Find out what resolution you need, and choose how your frame range. I want my render to go from frame 0 to frame 500 in this scene.
Now check the «save» box in the left menu, and click on the name to open the «save menu.»
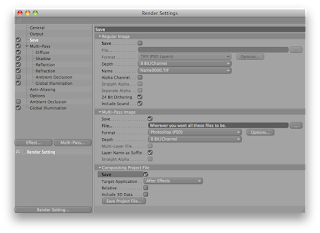
You don’t actually need to save the «background,» so no need to check the save box in the «Regular Image» menu, since we're doing everything with passes (yeah, thats how good we are!).
To save the multi-pass layers, you need to click «save» in the render settings, and check the save box in the «Multi-Pass Image» menu. Choose «Photoshop PSD» as file format and choose a path to save the passes. 8-bit depth will work fine, but 16 and 32 is also avalible if you’re into those things ;)
All the passes will be saved in one PSD-file as layers, and as one file per frame in the sequence. In other words; longer sequences, more files, smaller disc space.
And now for the life saving option: «Compositing Project File.» When working with multi-passes, you got many files and even more layers, all with different blend modes and opacity. Compositing this together could be a nightmare, but luckily Cinema 4D got a great resolution.

Under the «Muti-Pass Image» menu, you got a menu called «Compositing Project File». This menu may be opened, if not click on the small arrow at the left side of the name. Check save and choose your compositing software. I’ll use After Effects in this tutorial. Last, find a place to save this file. Cinema 4D makes a finished After Effects-file, ready to go! Every pass is pre sorted in layers with the right blending mode.
After Cinema 4D has finished the render, just open the .aec-file in After Effects. Here you can adjust every pass exactly as you wish. Turn down the shadow opacity, adjusting the colors, reflections and so on. It's your call! Now you've finished a sequence made of multi-passes only, the advanced way.
Ps: Remember to import and add the Ambient Occlusion sequence in After Effects if needed!
Post notes
I hope you learned something from this tutorial and hope you play around and try out whats best for your scene. Good luck!
So what do you think? Was this useful information?
-Torgeir Bull
If you want to, you can also download the tutorial as a PDF.
Fonte: sirBull


Nenhum comentário :
Postar um comentário